
Reclined Twist Yin Yoga pose is a nice way to neutralize our spine. You can do this pose either after a yoga practice or even after a long day at work, or even before bed, this pose can be a nice way to generally help wind down your energy.
There is that quote by John Pilates and B.K.S Iyengar that says “…we are only as young as our spine is flexible”!
Like this quote implies having a flexible spine makes us feel young, one must practice and work our spine through various movements to maintain the range of motion in our spine as we age. Specifically the 6 degrees of freedom (flexion, extension, twists both directions and lateral extension to the left and right) that our spine can move to increase and maintain mobility and flexibility in the entire spine.
Unless you have an injury, please take caution as some of the movements may not be appropriate for your spinal or back injury. Always consult your doctor before trying if you have any concerns.
By moving into the 6 degrees of freedom, this helps encourage tension release along the spine, mobility maintained (or improved in some cases) and encourages us to move the spine in the directions it is capable in moving. If we don’t practice moving our spine different ways, our mobility tends to decrease as we age.
The Yin Yoga Practice
In Reclined Twist Yin Yoga pose, not everyone will look the same in this pose (well any pose really). It’s important not to go too deep into the pose at the start. As time creeps up, while you hold in relative stillness, it can make the posture really hard to be in it, if you go too deep too fast. All of a sudden you’ll get the urge to come out, rather than marinating in the pose and getting the benefits out of a longer hold that’s not too deep to start.
Try twisting without yoga props, but if you realize you need them come out and adjust to be able to stay still for longer. Things like blocks or a bolster under your knees (more info below) or squeezing a block in between your knees can help modify the posture slightly to help keep your shoulders grounded.
We don’t want feel intensity in the pose right away, as we want to marinate in this pose for at least 3-5mins (or longer if you’re doing okay).
Dull achy feeling is what we are after!
Approach your edge, stay relatively still and hold for time.
TIME is our magic ingredient.
There are many ways you can be in and deepen Reclined Twist. See the section on different variations you can try with props to help you choose and modify the pose for YOU!
Keep in mind as you practice, practice with intention and attention and only hold as long as you can still be breathing calmly and staying relaxed in the targeted area, which is the SPINE in this case!
Pain is not gain in Yin Yoga!
Also to note, do this pose if you do not feel pain (pain can be defined as pinching, stabbing, numbing, stinging, tingling or warming sensations , even sharp sensations).
If you feel pain, back out right away. Only progress into a deeper version of the pose if you lose sensations (the dully achy feeling of the targeted area). If you are feeling a dull achy feeling, keep in relative stillness, anywhere from 3-5mins (if not longer). It is so important with anything to do with the spine to really be mindful and move slowly in and out of the pose, and again come out immediately, if you feel pain.
Pain is not gain in Yin Yoga.
AVOID THIS POSE if you have any spinal injuries that would impede the movements discussed. Always consult your physician or doctor you’re working with, if any of the movements may hurt you in any way.
Physical & Mental/Mindful Benefits of Reclined Twist Pose:

Spine targeted
releases tension from the spine
Restores equilibrium to nervous system
Meridian line stimulated is the urinary bladder (spine) and if one arms is overhead it stimulates the heart, lung, small intestines and large intestines meridian
Triggering these meridians can help release negative feelings of worry, anger, and sadness and bring out, positive feelings like creativity, kindness, beauty and love
Who wouldn’t want to encourage all those positive vibes to come out and release those negative emotions and feelings out of our tissues.
Next up, how to get into this amazing spinal release pose!
How to get into Reclined Twist Pose?
lay on your back, Shavasana (corpse pose), begin to take one leg into your chest, starting with your left leg bending in
hands can interlace on your shin on the bent leg, as shown in the image
hold here for a few breaths
move to position your hips two inches to the right. This creates your spine to be off centre or off a neutral position. Once you twist the spine gets back into more of a neutral position
as you exhale, begin to take your bent leg across to the other side. In our example the left leg starts to make its way to the right side
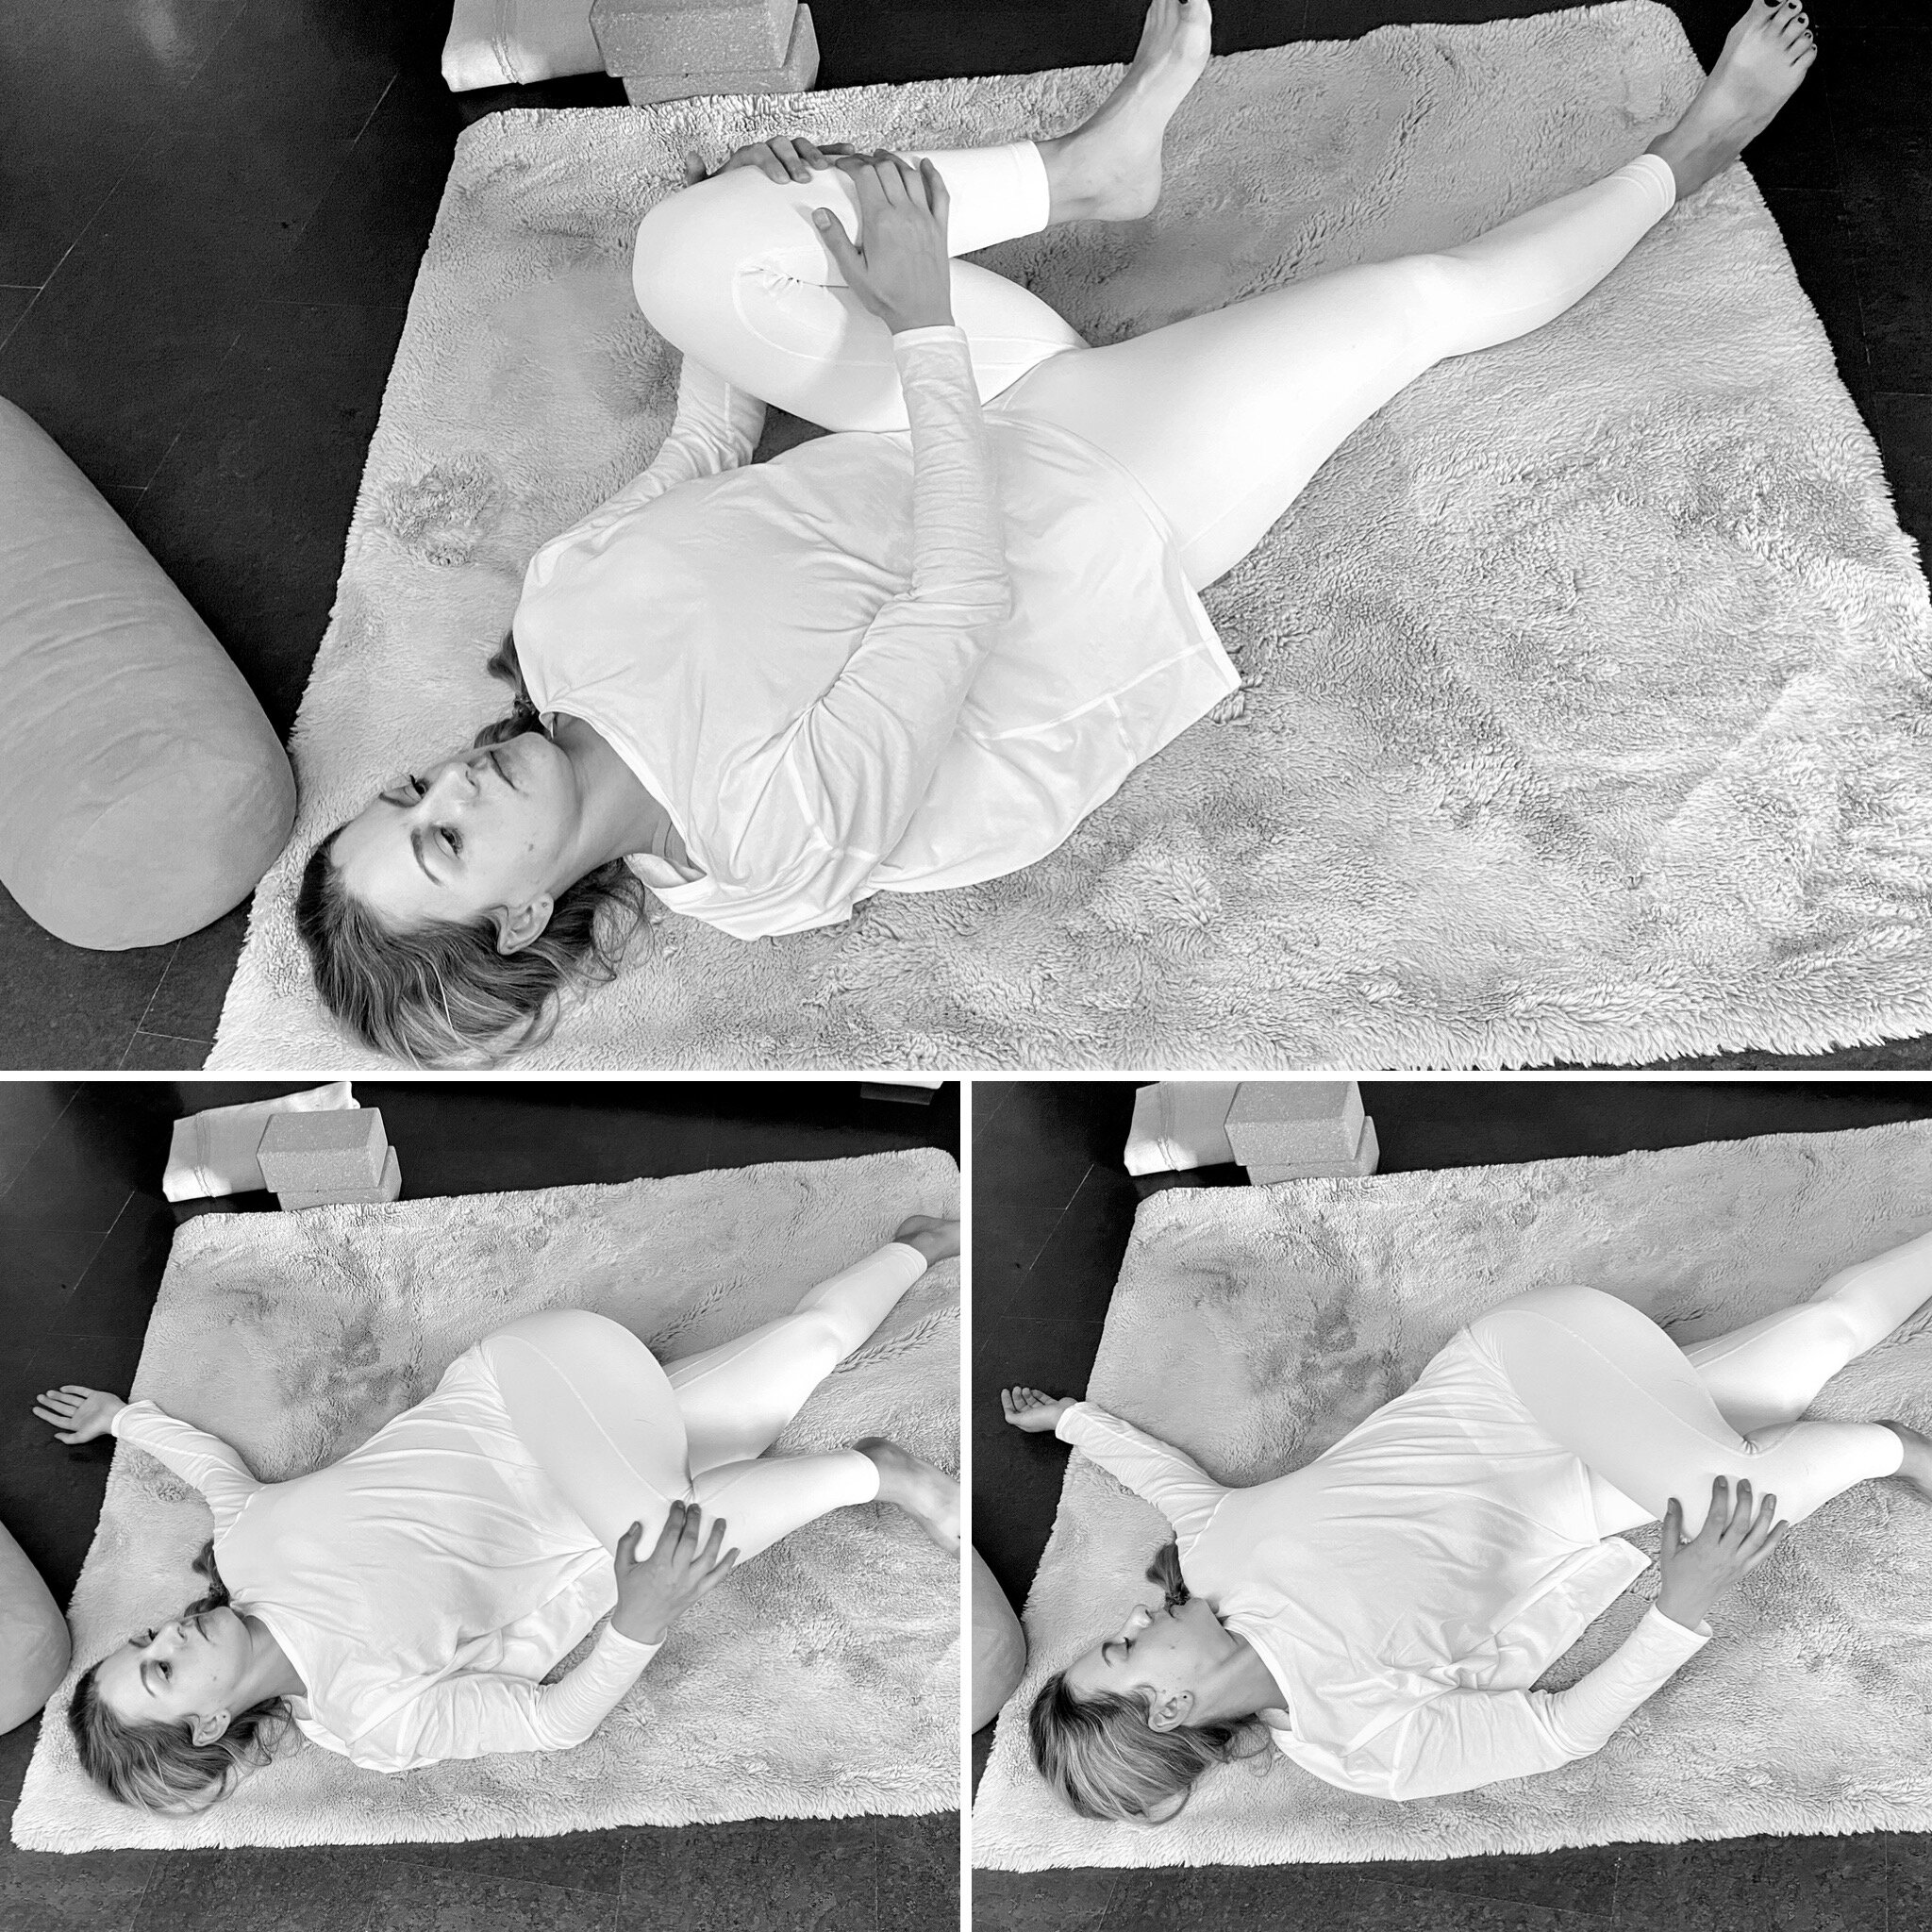
First shot above, shows how you bring one leg into your chest before twisting. The leg that’s bent would cross over the body to create the twist in the spine.
Either your knee can float in the sky allowing gravity to do its thing, or you can place a prop under the left knee to bring the earth up to you
lastly you can take your gaze towards the left hand (gaze away from the knees). But if you feel dizzy or have neck strain from doing this, take your gaze back up to the sky, back to a neutral position for the neck
if you feel a dull achy sensation along the spine, hold and stay (and breathe of course)
relax again completely, holding in stillness so you can feel the effects of the posture
NOT deep enough? Try staying longer in the hold or removing a yoga prop if you were using one
when COMING OUT and bringing back movement proceed with caution and move SLOW!
slowly come out and un-twist yourself back into Shavasana (corpse pose)
Tip: If you find it hard to relax into the spine try placing a bolster or block under your knee (or knees, if both legs are bent) once you twist to help prop the body up, which decreases the intensity of sensation
Caution: make sure to not feel any pain in the spine or low back. If your arms get tingly bring them closer to your hips
What should my arms be doing?
Well depends on the variation you’re in, but here are some suggestions on what you can do with your arms:
take them into a T shape
cactus arms or also known as “cowboy surrender”
one hand on the top leg’s knee (for an anchor), one hand in a 1/2 T position OR one arm could go overhead or try both if you don’t need that anchor
both arms straight, hands closer to your hips
Tip: if you feel tingling in your shoulders or arms with the arms in a T shape, bring the arms and your hands closer to your hips to minimize that pain sensation
Counter Pose for Reclined Twist pose
lay on your back in corpse pose / savasana to observe the effects of pose
for counter poses move or don’t move, find what works for you, after you come out of a long held posture you will learn and know what you prefer
wind shield wiper legs is sometimes nice instead of being completely still after holding Reclined Twist
legs up the wall without a wall. Here you would take your legs straight up, souls of your feet point to the sky. This allows the blood to run down the legs (or up the legs depending how you look at it from a laying down position)
Each day is different, assess what you need in the moment, not where you think you should go. The body becomes vulnerable from holding the postures in stillness and for time. Move out of the pose slowly, and choose your counter - move, don’t move!
Different Variations of Reclined Twist

Another variation of Reclined Twist but with both legs bent and knees stacked. Also shown Twisted root!
both knees bent
block in between both knees bent
top legs knee bent, bottom leg straight
bolster supporting the knees (or knee if you have one leg straight)
twisted root (garudasana, eagle legs)
you could try this pose against a wall, from leg’s up the wall bend your knees, and start to walk your souls to one direction against the well into a reclined twist
Come out of any and all Yin Yoga poses SLOW!!

Pictured here is a deeper variation of Reclined Twist, Twisted Root. Your top leg crosses over and wraps around the bottom leg. Drop your knees together to one side to enter into a twist. Keep both shoulders grounded.
Reclined Twist with using props!
If you struggle to stay in stillness and for time in this posture, try using props!!
You can use no props, but if you find the twist feels too intense anywhere in your body, but most importantly the targeted area, the spine, then back out, prop yourself up.
A general rule for using props BRING THE EARTH UP TO YOU. Here are some suggestions on how you can use them, below I have pictured, a bolster under the top legs knee. One leg is straight and my hand is resting on my knee to anchor it down.
bolster under knee(s)so that the leg can rest on the prop, this one is literally bringing the earth up to the leg (shown below in the picture)
bolster in between knees, inner thighs and feet
a block in-between the inner thighs
if you have someone around you can use a sandbag on the top legs outer hip to really anchor you
a blanket rolled up as a bolster or even place it in between knees, if you don’t want anything bulky
Try out different props you have, place it in between knees, take it out.
Compare, and be curious to discover your pose. Keep in mind, go to a place where you feel something, but not too much, and can hold for time. Anything longer than 1- 3mins is considered more Yin-like!

Enjoy the SPINE release!!
ALWAYS KEEP IN MIND when practicing Yin Yoga, be the OBSERVER, move SLOW and with ease, slowly approaching your edge rather than striving to go to some defined EDGE.
Don’t feel pressure to look like anyone else.
Start your practice from within and ask yourself where do I feel it?
What does it feel like? Is it painful? Or is it offering a nice release?
Practice with intention and attention as the Yin yoga master, Bernie Clark would say, and intuitively you will know.
This doesn’t come easy, it comes with practice.
Namaste,
Marzena
More on the Blog - Discover and try other Yin Yoga poses
Sources & Other Resources
Yin Pose Info taken from The Complete Guide to Yin Yoga (Bernie Clark, 2005) ✔️Yinyoga.com
YouTube videos on Reclining Twist explained and performed (Bernie Clark, 2011)